For this article, we would be using the following template to populate the GridView.
<html xmlns="http://www.w3.org/1999/xhtml" >
<head runat="server">
<title>GridView Tips and Tricks Part 2</title>
</head>
<body>
<form id="form1" runat="server">
<div>
<asp:GridView ID="GridView1" runat="server" AutoGenerateColumns="False" DataKeyNames="CategoryID"
DataSourceID="SqlDataSource1" ShowFooter="true" AllowPaging="True" AllowSorting="True"
PageSize="5" OnRowDataBound="GridView1_RowDataBound">
<Columns>
<asp:TemplateField HeaderText="CategoryID" InsertVisible="False" SortExpression="CategoryID">
<ItemTemplate>
<asp:Label ID="lblCategoryID" runat="server" Text='<%# Bind("CategoryID") %>'></asp:Label>
</ItemTemplate>
</asp:TemplateField>
<asp:TemplateField HeaderText="CategoryName" SortExpression="CategoryName">
<EditItemTemplate>
<asp:TextBox ID="txtCategoryName" runat="server" Text='<%# Bind("CategoryName") %>'></asp:TextBox>
</EditItemTemplate>
<ItemTemplate>
<asp:Label ID="lblCategoryName" runat="server" Text='<%# Bind("CategoryName") %>'></asp:Label>
</ItemTemplate>
</asp:TemplateField>
<asp:TemplateField HeaderText="Description" SortExpression="Description">
<EditItemTemplate>
<asp:TextBox ID="txtDesc" runat="server" Text='<%# Bind("Description") %>'></asp:TextBox>
</EditItemTemplate>
<ItemTemplate>
<asp:Label ID="lblDesc" runat="server" Text='<%# Bind("Description") %>'></asp:Label>
</ItemTemplate>
</asp:TemplateField>
</Columns>
</asp:GridView>
<asp:SqlDataSource ID="SqlDataSource1" runat="server" ConnectionString="Data Source=SUPROTIM;Initial Catalog=Northwind;Integrated Security=True"
ProviderName="System.Data.SqlClient" SelectCommand="SELECT [CategoryID], [CategoryName], [Description] FROM [Categories]"
UpdateCommand="UPDATE [Categories] SET [CategoryName] = @CategoryName, [Description] = @Description WHERE [CategoryID] = @CategoryID"/>
</div>
</form>
</body>
</html>
The web.config holding the connection will look similar to the following:
<configuration>
<appSettings/>
<connectionStrings>
<add name="NorthwindConnectionString" connectionString="Data Source =(local);Integrated Security = SSPI; Initial Catalog=Northwind;"/>
</connectionStrings>
...
</configuration>
Tip 1: Change the color of a GridView Row based on some condition
protected void GridView1_RowCreated(object sender, GridViewRowEventArgs e)
{
if (e.Row.DataItem != null)
{
DataRowView drv = (DataRowView)e.Row.DataItem;
string catName = Convert.ToString(drv["CategoryName"]);
if (catName.Trim() == "Confections")
e.Row.BackColor = System.Drawing.Color.LightBlue;
}
}
Tip 2: How to create an Image Command Field Column and add to the GridView at runtime
if (!Page.IsPostBack)
{
CommandField cmdField = new CommandField();
cmdField.ButtonType = ButtonType.Image;
cmdField.SelectImageUrl = "~/Images/Home_Np1.GIF";
cmdField.ShowSelectButton = true;
cmdField.HeaderText = "Select";
GridView1.Columns.Add(cmdField);
GridView1.DataBind();
}
Tip 3: How to display images in the GridView from Filesystem based on an existing Column
Let us imagine that you have a folder ‘Images’ where you have stored images for each category. Eg: 1.GIF, 2.GIF, 3.GIF and so on. Now you want to display a different image based on each CategoryID. So for CategoryID = 1, the image is 1.GIF; for CategoryID=2, the image is 2.GIF and so on.
<asp:TemplateField>
<ItemTemplate>
<asp:Image runat="server" ImageUrl='<%# "~/Images/"+ Eval("CategoryID") + ".GIF" %>' >
</asp:Image>
</ItemTemplate>
</asp:TemplateField>
Tip 4: How to Retrieve Images from the database and display it in a GridView
I will assume that we have a image column called CatImg in the Categories table.
The first step would be to create an ImageHandler. In such scenarios such as the gridview, usually prefer to go in for a handler when I have to return binary data directly from the database. It gives more control on the resource returned. Moreover it is a preferred solution when you have to set the image programmatically.
To add a handler, right click project > Add New Item > Generic Handler > ShowImage.ashx. The code shown below, uses the Request.QueryString[“id”] to retrieve the CategoryID from it. The ID is then passed to the ‘ShowCatImage()’ method where the image is fetched from the database and returned in a MemoryStream object. We then read the stream into a byte array. Using the OutputStream.Write(), we write the sequence of bytes to the current stream and you get to see your image.
<%@ WebHandler Language="C#" Class="ShowImage" %>
using System;
using System.Configuration;
using System.Web;
using System.IO;
using System.Data;
using System.Data.SqlClient;
public class ShowImage : IHttpHandler
{
public void ProcessRequest(HttpContext context)
{
Int32 catid;
if (context.Request.QueryString["id"] != null)
catid = Convert.ToInt32(context.Request.QueryString["id"]);
else
throw new ArgumentException("No parameter specified");
context.Response.ContentType = "image/jpeg";
Stream strm = ShowCatImage(catid);
byte[] buffer = new byte[4096];
int byteSeq = strm.Read(buffer, 0, 4096);
while (byteSeq > 0)
{
context.Response.OutputStream.Write(buffer, 0, byteSeq);
byteSeq = strm.Read(buffer, 0, 4096);
}
//context.Response.BinaryWrite(buffer);
}
public Stream ShowCatImage(int catid)
{
string conn = ConfigurationManager.ConnectionStrings["NorthwindConnectionString"].ConnectionString;
SqlConnection connection = new SqlConnection(conn);
string sql = "SELECT catImg FROM Categories WHERE CategoryID = @ID";
SqlCommand cmd = new SqlCommand(sql, connection);
cmd.CommandType = CommandType.Text;
cmd.Parameters.AddWithValue("@ID", catid);
connection.Open();
object img = cmd.ExecuteScalar();
try
{
return new MemoryStream((byte[])img);
}
catch
{
return null;
}
finally
{
connection.Close();
}
}
public bool IsReusable
{
get
{
return false;
}
}
}
To access this image in the GridView based on the CategoryID, just add the following:
<asp:TemplateField>
<ItemTemplate>
<asp:Image runat="server" ImageUrl='<%# "ShowImage.ashx?id=" + Eval("CategoryID") %>' >
</asp:Image>
</ItemTemplate>
</asp:TemplateField>
Tip 5: How to programmatically enable/disable a control in the GridView when in the Edit Mode
If you want to quickly take a decision whether to enable or disable a control when the user edits the row, then use the Enabled attribute and set it to a method that returns a bool value:
<asp:TemplateField HeaderText="CategoryName" SortExpression="CategoryName">
<EditItemTemplate>
<asp:TextBox ID="txtCategoryName" runat="server" Enabled='<%# EnableDisableTextBox() %>' Text='<%# Bind("CategoryName") %>'></asp:TextBox>
</EditItemTemplate>
<ItemTemplate>
<asp:Label ID="lblCategoryName" runat="server" Text='<%# Bind("CategoryName") %>'></asp:Label>
</ItemTemplate>
</asp:TemplateField>
C#
protected bool EnableDisableTextBox()
{
if (1 == 1)
return false;
}
You can test this code by adding a CommandField to the GridView as shown below
<asp:CommandField ButtonType="Link" ShowEditButton="true" />
Tip 6: How to insert an Image in between Rows of a GridView using ASP.NET
At times, you need to perform these custom routines, to add your own data, when the data is being bound to a GridView control. In this article, we will explore how to insert image or text in between the rows of a GridView. We will also see how we can create new rows on the fly and attach them to the GridView control at runtime. Follow these steps:
Step 1: Create a new ASP.NET website. Drag and drop a SqlDataSource Control to the page and use the wizard to connect to the Northwind database. Select the CustomerId, CompanyName, ContactName, Address and City from the Customers table. The wizard will also prompt you to save the connection string in the web.config file. Choose to do so. The design code will look similar to the following:
<asp:SqlDataSource ID="SqlDataSource1" runat="server" ConnectionString="<%$ ConnectionStrings:NorthwindConnectionString %>"
SelectCommand="SELECT [CustomerID], [CompanyName], [ContactName], [Address], [City] FROM [Customers]">
</asp:SqlDataSource>
An entry will be added to the web.config file as shown below:
<connectionStrings>
<add name="NorthwindConnectionString" connectionString="Data Source=(local);Initial Catalog=Northwind;Integrated Security=True" providerName="System.Data.SqlClient"/>
</connectionStrings>
Step 2: Now add a GridView control to the page and using the smart tag, select the DataSource to be SqlDataSource1 in the GridView tasks panel. Using the same panel, click on the Enable Paging and Enable Sorting checkboxes. The source will look similar to the following.
<asp:GridView ID="GridView1" runat="server" AllowPaging="True" AllowSorting="True"
AutoGenerateColumns="False" DataKeyNames="CustomerID" DataSourceID="SqlDataSource1"
OnRowDataBound="GridView1_RowDataBound" Font-Names="Verdana" Font-Size="Small">
<Columns>
<asp:BoundField DataField="CustomerID" HeaderText="CustomerID" ReadOnly="True" SortExpression="CustomerID" />
<asp:BoundField DataField="CompanyName" HeaderText="CompanyName" SortExpression="CompanyName" />
<asp:BoundField DataField="ContactName" HeaderText="ContactName" SortExpression="ContactName" />
<asp:BoundField DataField="Address" HeaderText="Address" SortExpression="Address" />
<asp:BoundField DataField="City" HeaderText="City" SortExpression="City" />
</Columns>
</asp:GridView>
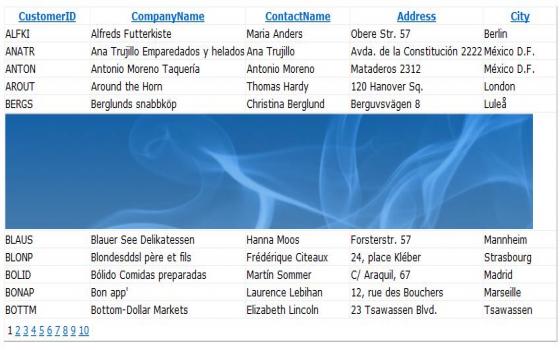
Step 3: We will now need to think of a way to add our own custom row with the image, in between the existing rows of a GridView. The GridView renders as a table and contains rows and cells. If we could somehow create a cell on the fly, add our image to the cell and then add the cell to the row, we should be able to achieve our requirement. All this needs to be done while the row is being bound to data in the GridView control. Well the event that we will make use of to perform all the action, is the GridView_RowDataBound event. This event enables you to provide an event-handling method that performs a custom routine, such as modifying the values of the data bound to the row, whenever this event occurs. Before that, add a page level variable called pgSize which will hold the row position at which we need to insert the image. Also add an image to your project that is about the same width as that of your GridView. The comments have been marked inside the code to help you understand. The entire code will look similar to the following:
C#
public partial class _Default : System.Web.UI.Page
{
static int pgSize;
protected void Page_Load(object sender, EventArgs e)
{
if(!Page.IsPostBack)
pgSize = 0;
}
protected void GridView1_RowDataBound(object sender, GridViewRowEventArgs e)
{
if (e.Row.RowType == DataControlRowType.DataRow)
{
TableCell tCell = new TableCell();
// create image
Image img = new Image();
img.ImageUrl = "subheader.jpg";
// add the image to the cell
tCell.Controls.Add(img);
GridView gView = (GridView)sender;
// set the colspan to occupy the other cells in the row
int colSpan = gView.Columns.Count;
tCell.Attributes["ColSpan"] = colSpan.ToString();
GridViewRow gRow = new GridViewRow(-1, -1, DataControlRowType.DataRow, DataControlRowState.Normal);
// add the cells to the gridviewrow
gRow.Cells.Add(tCell);
Table tbl = (Table)e.Row.Parent;
// set the pagesize initially to the pagecount/2
// in our case it is 10/2 = 5. So the first image will
// displayed after the 5th row.
if(pgSize == 0)
pgSize = GridView1.PageCount / 2;
// This step is performed so that we can display the image only after every
// 5, 15, 25 ,35 rows and so on ...
// The logic is not perfect but will give you the idea
if (Convert.ToDouble(e.Row.DataItemIndex + 1) / Convert.ToDouble(pgSize) == 1.0)
{
tbl.Controls.AddAt(gView.Controls[0].Controls.Count, gRow);
// add 10 to the pgsize so that the image can be displayed
// at rows 5, 15, 25 and so on..
pgSize = pgSize + 10;
}
}
}
}
The rendered GridView at the end will look similar to the following
Tip 7: How to loop through all the rows in all the pages of a GridView
One simple way to loop through all the rows in all the pages of a GridView is to access its DataSource. In this example, we will loop through the SQLDataSource to retrieve all the rows in a GridView and access its cell value. You can modify the logic depending on the type of controls you have added to the GridView
C#
protected void Button1_Click(object sender, EventArgs e)
{
DataSourceSelectArguments dsaArgs = new DataSourceSelectArguments();
DataView view = (DataView)SqlDataSource1.Select(dsaArgs);
DataTable dt = view.ToTable();
for (int i = 0; i < dt.Rows.Count; i++)
{
for (int j = 0; j < dt.Columns.Count; j++)
{
string s = dt.Rows[i][j].ToString();
}
}
}
Tip 8: Enable Disable Controls inside a GridView
There are at times when you have to disable controls on some rows, when a certain condition is satisfied. In this snippet, we will see how to disable editing for rows that have the CategoryName as ‘Confections’. Use the following code:
C#
protected void GridView1_RowDataBound(object sender, GridViewRowEventArgs e)
{
if (e.Row.RowType == DataControlRowType.DataRow)
{
if (e.Row.DataItem != null)
{
Label lblControl = (Label)e.Row.Cells[2].FindControl("lblCategoryName");
if(lblControl.Text == "Confections")
{
e.Row.Cells[0].Enabled = false;
}
}
}
}
Tip 9: Adding Arrows for Sorting Columns in a GridView
When you are sorting the columns in a GridView, it would be a nice to have feature, to display arrows which depict either an ascending or descending sort as shown below. Create a folder called ‘images’ and add two small images called up.gif and down.gif:
C#
protected void GridView1_RowDataBound(object sender, GridViewRowEventArgs e)
{
if (e.Row.RowType == DataControlRowType.Header)
{
foreach (TableCell cell in e.Row.Cells)
{
if (cell.HasControls())
{
LinkButton btnSort = (LinkButton)cell.Controls[0];
Image image = new Image();
if (btnSort.Text == GridView1.SortExpression)
{
if (GridView1.SortDirection == SortDirection.Ascending)
{
image.ImageUrl = "images/up.gif"; }
else
{
image.ImageUrl = "images/down.gif";
}
}
cell.Controls.Add(image);
}
}
Tip 10: How to Add a Row Number to the Gridview
Just add the following tags to your <columns> section of your GridView
<asp:TemplateField> <ItemTemplate> <%# Container.DataItemIndex + 1 %> </ItemTemplate></asp:TemplateField> Tip 11: How to programmatically hide a column in the GridView
There are two conditions to be checked in the Page_Load to hide a columns in the GridView, let us say the 3rd column:
If ‘AutoGenerateColumns’ = True on the GridView
C#
GridView1.HeaderRow.Cells[2].Visible = false;
foreach (GridViewRow gvr in GridView1.Rows)
{
gvr.Cells[2].Visible = false;
}
If ‘AutoGenerateColumns’ = False on the GridView
C#
GridView1.Columns[2].Visible = false;
Tip 12: Handling Concurrency Issues in GridView
If you are using the SqlDataSource (or ObjectDataSource), you can use both the SqlDataSource.ConflictDetection and OldValuesParameterFormatString property to handle concurrency issues. These two properties together control how to perform updates and delete operations when the underlying data source changes, while the operation is being carried out. The original and modified versions of each column can be tracked using the two properties.
Tip 13: How to transfer multiple values from GridView to a different page
A common requirement in our projects is to select a GridView row and pass multiple values of the selected row to another page. I recently got a request from a few readers who wanted an article on this. In this article, we will explore how simple it is to achieve this requirement.
I assume you have some basic understanding of the GridView and how to bind it to a Data Source control. The Hyperlink control added to the GridView makes it quiet easy to select a row and send single/multiple values to a different page through the URL. Let us see how:
Step 1: Create a new ASP.NET website. Drag and drop a SqlDataSource Control to the page and use the wizard to connect to the Northwind database. Select the CustomerId, CompanyName, ContactName, Address and City from the Customers table. The wizard will also prompt you to save the connection string in the web.config file. Choose to do so. The design code will look similar to the following:
<asp:SqlDataSource ID="SqlDataSource1" runat="server" ConnectionString="<%$ ConnectionStrings:NorthwindConnectionString %>"
SelectCommand="SELECT [CustomerID], [CompanyName], [ContactName], [Address], [City] FROM [Customers]">
</asp:SqlDataSource>
An entry will be added to the web.config file as shown below:
<connectionStrings>
<add name="NorthwindConnectionString" connectionString="Data Source=(local);Initial Catalog=Northwind;Integrated Security=True"providerName="System.Data.SqlClient"/>
</connectionStrings>
Step 2: Now add a GridView control to the page and using the smart tag, select the DataSource to be SqlDataSource1 in the GridView tasks panel. Using the same panel, click on the Enable Paging and Enable Sorting checkboxes. The source will look similar to the following. Observe that the DataKeyNames is set to ‘CustomerId’, that is the primary key of the Customers table.
<asp:GridView ID="GridView1" runat="server" AutoGenerateColumns="False" DataKeyNames="CustomerID"
DataSourceID="SqlDataSource1" AllowPaging="True" AllowSorting="True">
<Columns>
<asp:BoundField DataField="CustomerID" HeaderText="CustomerID" ReadOnly="True" SortExpression="CustomerID" />
<asp:BoundField DataField="CompanyName" HeaderText="CompanyName" SortExpression="CompanyName" />
<asp:BoundField DataField="ContactName" HeaderText="ContactName" SortExpression="ContactName" />
<asp:BoundField DataField="Address" HeaderText="Address" SortExpression="Address" />
<asp:BoundField DataField="City" HeaderText="City" SortExpression="City" />
</Columns>
</asp:GridView>
Step 3: We will now add another page in our project. In the Solution Explorer, right click the project > Add New Item > Web Form > Rename it to ‘CustomerDetails.aspx’.
Step 4: Go back to Default.aspx and add two hyperlink fields. We will see how to pass a single value as well as multiple values using the two hyperlink fields.
Single Value:
Add the following hyperlink control after the <Columns> tag in the GridView as shown below:
<Columns>
<asp:HyperLinkField DataNavigateUrlFields="CustomerID" DataNavigateUrlFormatString="CustomerDetails.aspx?CID={0}" Text="Pass Single Value" />
Multiple Values:
Just below the first hyperlink field, add another hyperlink field as shown below:
<asp:HyperLinkField DataNavigateUrlFields="CustomerID, CompanyName, ContactName, Address, City" DataNavigateUrlFormatString="CustomerDetails.aspx?CID={0}&CName={1}&ContactName={2}&Addr={3}&City={4}" Text="Pass Multiple Values" />
In the source code shown above, we are using the hyperlink field and setting some properties that will make it extremely easy to pass values to a different page. The 'DataNavigateUrlFields' sets the names of the fields, that is to be used to construct the URL in the HyperLinkField. In the first hyperlink, since we are passing only a single value, the DataNavigateUrlFields contains only CustomerID. However in the second hyperlink, since there are multiple values to be passed, DataNavigateUrlFields contains all the names of the fields that are to be passed as query string to CustomerDetails.aspx
Similarly, the 'DataNavigateUrlFormatString' sets the string that specifies the format in which the URL is to be created. The 'Text' property represents the text that will be displayed to the user. The entire source code will look similar to the following:
<body>
<form id="form1" runat="server">
<div>
<asp:SqlDataSource ID="SqlDataSource1" runat="server" ConnectionString="<%$ ConnectionStrings:NorthwindConnectionString %>"
SelectCommand="SELECT [CustomerID], [CompanyName], [ContactName], [Address], [City] FROM [Customers]">
</asp:SqlDataSource>
</div>
<asp:GridView ID="GridView1" runat="server" AutoGenerateColumns="False" DataKeyNames="CustomerID"
DataSourceID="SqlDataSource1" AllowPaging="True" AllowSorting="True">
<Columns>
<asp:HyperLinkField DataNavigateUrlFields="CustomerID"
DataNavigateUrlFormatString="CustomerDetails.aspx?CID={0}"
Text="Pass Single Value" />
<asp:HyperLinkField DataNavigateUrlFields="CustomerID, CompanyName, ContactName, Address, City"
DataNavigateUrlFormatString="CustomerDetails.aspx?CID={0}&CName={1}&ContactName={2}&Addr={3}&City={4}"
Text="Pass Multiple Values" />
<asp:BoundField DataField="CustomerID" HeaderText="CustomerID" ReadOnly="True" SortExpression="CustomerID" />
<asp:BoundField DataField="CompanyName" HeaderText="CompanyName" SortExpression="CompanyName" />
<asp:BoundField DataField="ContactName" HeaderText="ContactName" SortExpression="ContactName" />
<asp:BoundField DataField="Address" HeaderText="Address" SortExpression="Address" />
<asp:BoundField DataField="City" HeaderText="City" SortExpression="City" />
</Columns>
</asp:GridView>
</form>
</body>
Step 5: The last step is to retrieve the query string variables from the URL in the CustomerDetails.aspx page. Add the following code for that:
C#
protected void Page_Load(object sender, EventArgs e)
{
string cid = Request.QueryString["CID"];
string cname = Request.QueryString["CName"];
string contactName = Request.QueryString["ContactName"];
string address = Request.QueryString["Addr"];
string city = Request.QueryString["City"];
}
Set a breakpoint at the Page_Load method of the CustomerDetails.aspx. Run the application and click on either the ‘Pass Single Value’ or ‘Pass Multiple Values’ hyperlink to pass values to the CustomerDetails.aspx page. Using the breakpoint, observe the values of the selected row being passed to the CustomerDetails page.
Tip 14: Displaying Empty Data in a GridView
When there are no results returned from the GridView control’s data source, the short and simple way of displaying a message to the user, is to use the GridView’s EmptyDataText property.
<asp:GridView ID="GridView1" runat="server" AutoGenerateColumns="False" DataKeyNames="CategoryID"
DataSourceID="SqlDataSource1" EmptyDataText="No data available"
ShowFooter="true" AllowPaging="True" AllowSorting="True"
PageSize="5" OnRowDataBound="GridView1_RowDataBound">
Note: You can also add style to the EmptyDataText by using the EmptyDataRowStyle property.
Tip 15: Displaying an Image in case of Empty Data in a GridView
As an alternative to using the EmptyDataText property, if you need to display an image or any HTML/ASP.NET control, you can use the EmptyDataTemplate. In this snippet below, we are using the image control in the <EmptyDataTemplate> to display an image.
<asp:GridView ID="GridView1" runat="server" AutoGenerateColumns="False" DataKeyNames="CategoryID"
DataSourceID="SqlDataSource1" ShowFooter="true" AllowPaging="True" AllowSorting="True"
PageSize="5" OnRowDataBound="GridView1_RowDataBound">
<EmptyDataTemplate>
<asp:Image id="imgNoData"
ImageUrl="~/images/NoDataFound.jpg"
AlternateText="No data found"
runat="server"/>
</EmptyDataTemplate>
Tip 16: Highlight a Row in GridView without a PostBack
Selecting a row in the GridView causes a postback. In order to highlight a row in the GridView, you have to set the ‘SelectedRowStyle’ property which takes effect when the postback occurs. In this article, we will see how to highlight a row without causing a postback.
We will be using the RowCreated event of the GridView. A GridViewRow object is created for each row in the control before the GridView is rendered. Whenever a row in the GridView gets created, the RowCreated event is fired. Using this event, we can customize the behavior of the GridView. For e.g.: adding client script to the row or customizing the content of the row. Let us see an example where we will be adding some client script to the GridView. I assume that you have some experience of creating data sources and binding controls to it.
Perform the following steps:
Step 1: Create an asp.net website. In the Default.aspx page, add a GridView and a SqlDataSource control to it.
Step 2: Configure the connection of SqlDataSource to point to the Northwind database. Create query for the Select command to fetch records from the Customer table. The resultant code will look similar to the one given below:
<asp:SqlDataSource ID="SqlDataSource1" runat="server" ConnectionString="<%$ ConnectionStrings:NorthwindConnectionString %>"
SelectCommand="SELECT [CustomerID], [CompanyName], [ContactName], [ContactTitle], [Address], [City] FROM [Customers]">
</asp:SqlDataSource>
The web.config will look similar to the following
<connectionStrings>
<add name="NorthwindConnectionString" connectionString="Data Source =.;Integrated Security = SSPI; Initial Catalog=Northwind;"/>
</connectionStrings>
Step 3: Once the SqlDataSource has been configured, bind the GridView to this data source. Also set ‘AllowPaging’ and ‘AllowSorting’ to true. The mark up will look similar to the following:
<body>
<form id="form1" runat="server">
<div>
<asp:GridView ID="GridView1" runat="server" AutoGenerateColumns="False" DataKeyNames="CustomerID" DataSourceID="SqlDataSource1" AllowPaging="True" AllowSorting="True">
<Columns>
<asp:BoundField DataField="CustomerID" HeaderText="CustomerID" ReadOnly="True" SortExpression="CustomerID" />
<asp:BoundField DataField="CompanyName" HeaderText="CompanyName" SortExpression="CompanyName" />
<asp:BoundField DataField="ContactName" HeaderText="ContactName" SortExpression="ContactName" />
<asp:BoundField DataField="ContactTitle" HeaderText="ContactTitle" SortExpression="ContactTitle" />
<asp:BoundField DataField="Address" HeaderText="Address" SortExpression="Address" />
<asp:BoundField DataField="City" HeaderText="City" SortExpression="City" />
</Columns>
</asp:GridView>
</div>
<asp:SqlDataSource ID="SqlDataSource1" runat="server" ConnectionString="<%$ ConnectionStrings:NorthwindConnectionString %>"
SelectCommand="SELECT [CustomerID], [CompanyName], [ContactName], [ContactTitle], [Address], [City] FROM [Customers]">
</asp:SqlDataSource>
</form>
</body>
Step 4: Now switch to the design mode and select the GridView. Go to the properties window (F4) and click on the lightning like bolt to display the events of the GridView. Double click the RowCreated event to add the event. The mark up will look similar to the following
<asp:GridView ID="GridView1" runat="server" AutoGenerateColumns="False" DataKeyNames="CustomerID" DataSourceID="SqlDataSource1" AllowPaging="True" AllowSorting="True" OnRowCreated="GridView1_RowCreated">
...
</asp:GridView>
Step 5: In the code behind of Default.aspx, add the following code to the RowCreated event handler
protected void GridView1_RowCreated(object sender, GridViewRowEventArgs e)
{
e.Row.Attributes.Add("onMouseOver", "this.style.background='#eeff00'");
e.Row.Attributes.Add("onMouseOut", "this.style.background='#ffffff'");
}
As you are already aware that the GridView is rendered as a HTML table and each row as <TR>. In the code shown above, we are using the Attributes property of the AttributeCollection to add extra properties to the <TR> element. The onMouseOver and the onMouseOut events are added that enable the row to change its color whenever the mouse is over a particular row.
Run the application and see the color of the rows changing, that too without a postback!!
Well that was a quick overview of the RowCreated event. You can also use the same event to find the index of the row clicked. Just use e.Row.DataItemIndex.ToString() to retrieve the selected row index information.
Tip 17: How to Bind a List<> to a GridView
Let us see how to bind a List<> to a GridView. We assume that the ‘AutoGenerateColumns’ = True. We will create a class called Employees and bind it to the GridView with the help of a List<>.
Create a class called ‘Employees’
C#
public class Employee
{
private string enm;
private int ageofemp;
private string department;
public string EName
{
get
{
return enm;
}
set
{
enm = value;
}
}
public int Age
{
get
{
return ageofemp;
}
set
{
ageofemp = value;
}
}
public string Dept
{
get
{
return department;
}
set
{
department = value;
}
}
public Employee(string ename, int age, string dept)
{
this.enm = ename;
this.ageofemp = age;
this.department = dept;
}
}
Bind the ‘Employee’ data to the GridView using a List<>
C#
protected void Page_Load(object sender, EventArgs e)
{
System.Collections.Generic.List<Employee> emp = new System.Collections.Generic.List<Employee>();
emp.Add(new Employee("Jack", 22, "Marketing"));
emp.Add(new Employee("Anna", 28, "Advertising"));
emp.Add(new Employee("Linra", 23, "Advertising"));
emp.Add(new Employee("Jacob", 44, "Production"));
emp.Add(new Employee("Zinger", 28, "PPC"));
GridView1.DataSource = emp;
GridView1.DataBind();
}
Well that was a quick overview of some of the most frequently used features of the GridView control. I hope you liked the article and I thank you for viewing it.
No comments:
Post a Comment